Sign In
How to Install an ESD Workstation
How to install an ESD Workstation: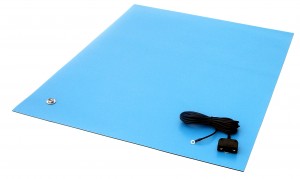
- Lay the table mat flat on the workbench with the snaps toward the operator. (Tip: Mild heat (sun light) will remove creases caused by shipping.)
- Connect the common point ground cord to the table mat by snapping it to the left or right snap.

- Connect the coil cord to the common point ground cord by plugging the banana plug into one of the ground cord’s banana jacks.
- Snap the wrist band to the coil cord. (Tip: make sure that the operator wears the wrist band on bare skin and tightens the band so that no gap exists between the skin and the band.
- Lay the floor mat on the floor in front of the workbench with the snaps toward the bench.
- Connect the floor mat ground cord to one snap on the floor mat.

- Connect the common point ground cord and floor mat ground cord to ground. Use the green wire building ground point as specified in EOS/ESD Standard 6. Connection to this ground point is most easily accomplished by removing the center AC outlet plate cover screw, placing the screw through the eyelets from both ground cords, and replacing the screw. The wires can be moved to the left and right sides of the screw so that they do not obstruct the outlet.
 Heel Grounders: Open the velcro strap. Place foot back into shoe and slip rubber cup onto the heel of the shoe. Insert tab into shoe and trim excess tab material with scissors if necessary. Close velcro strap. Repeat procedure for other shoe.
Newly installed workstations should be tested for continuity. A surface resistivity meter with a “resistance to ground” function can be used to test continuity from the ground point to all parts of the workstation.